
Protruding front teeth · Limited orthodontics · Minimally prepared veneers
What if we aligned protruding front teeth before changing their shape with veneers? Let me explain how I planned veneers after about five months of limited orthodontic treatment for a patient who could not commit to lengthy orthodontic care.
My goals were to reduce the appearance of protrusion and achieve the patient’s preferred more even front-tooth shapes and a brighter shade. Orthodontics moves teeth, whereas veneers adjust their surface shape and colour. I therefore planned a separate role for each treatment.
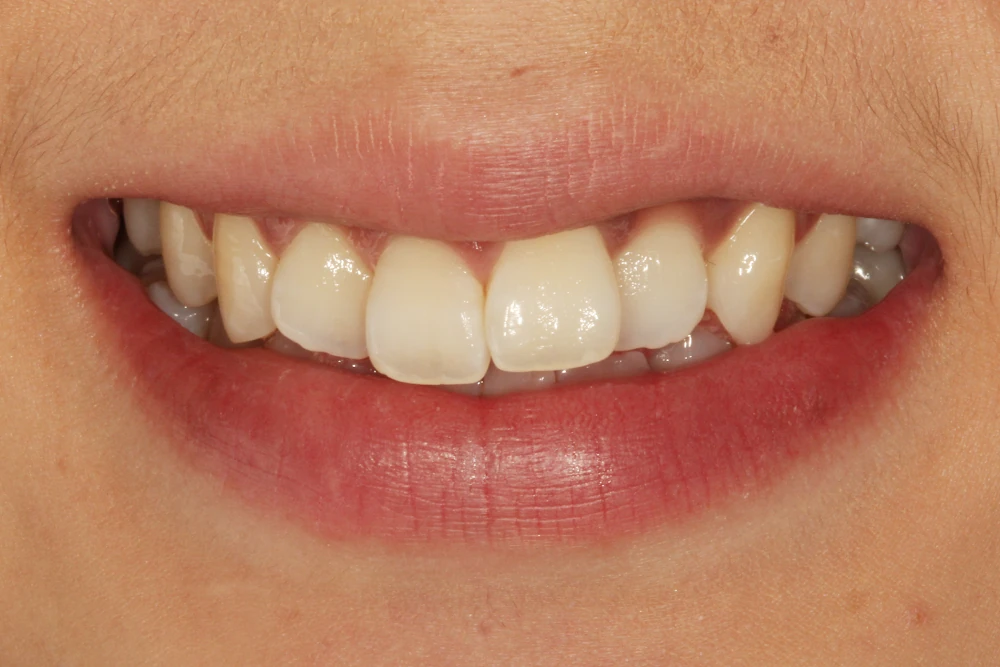
Photographed: 27 January 2011

Photographed: 23 June 2011
These are records of the same patient before treatment and one week after veneer placement. Angles and lighting differ. Treatment times and outcomes vary between patients.
Limited orthodontics cannot address every protrusion or bite problem. Tooth tissue removed for veneers cannot be restored to its original state. Reducing preparation does not eliminate sensitivity, debonding, fracture, gum inflammation or orthodontic relapse. We first discuss treatment scope, alternatives and ongoing care.
01 · Assessing the protruding front teeth
The patient wanted to improve the protruding appearance but could not undergo prolonged orthodontic treatment. I examined both dental arches, the bite and the direction of the teeth in profile, as well as the frontal smile. Distinguishing tooth position from the teeth’s own shape and colour was the starting point.
Front-tooth alignment and bite before treatment
This records the apparent direction of the front teeth and how the upper and lower teeth meet.
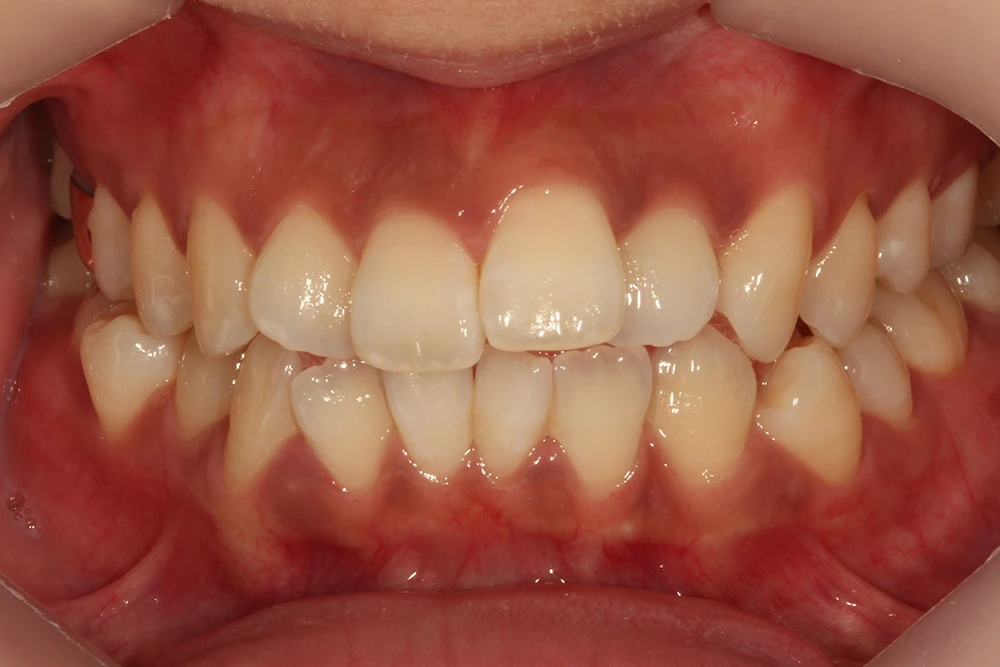
Photographed: 27 January 2011
Assessing both dental arches
I examined the shape of both arches, not just their appearance from the front, to plan the sequence of orthodontics and veneers.
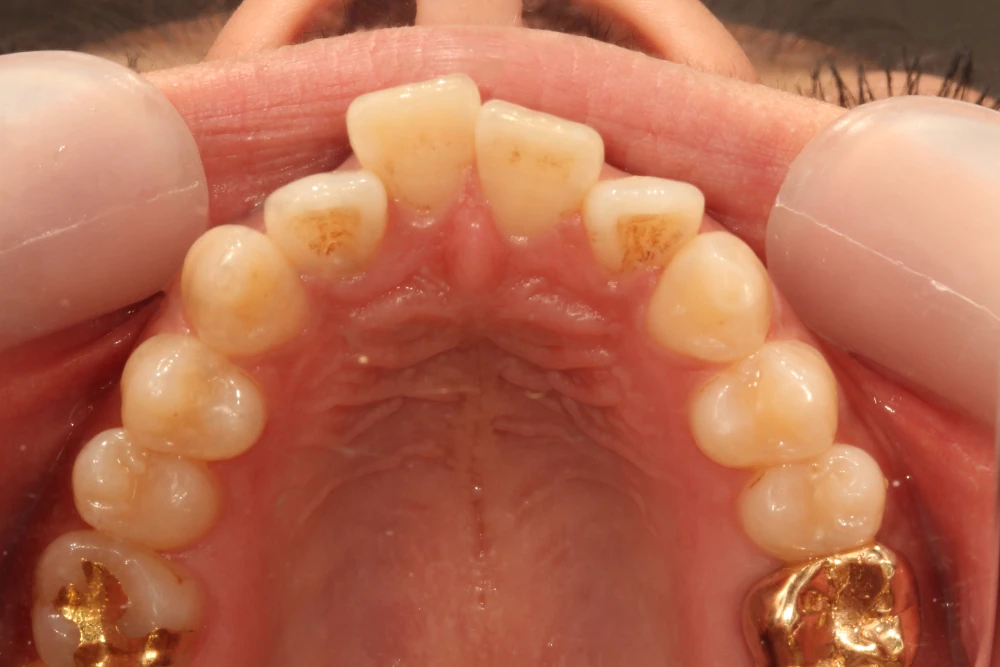
Photographed: 27 January 2011

Photographed: 27 January 2011
02 · Aligning the front teeth first
Instead of beginning with veneers, I first carried out limited orthodontic treatment focused on the front teeth. I considered the future veneer positions and bite rather than moving teeth aggressively simply to shorten treatment.
Aligning the teeth first to reduce the reshaping required for veneers was the purpose of this sequence. Orthodontic duration varies by patient, and whether limited treatment can be an alternative to comprehensive orthodontics requires an individual assessment.
Beginning orthodontic treatment
The appliances are in place as alignment of the front teeth begins.
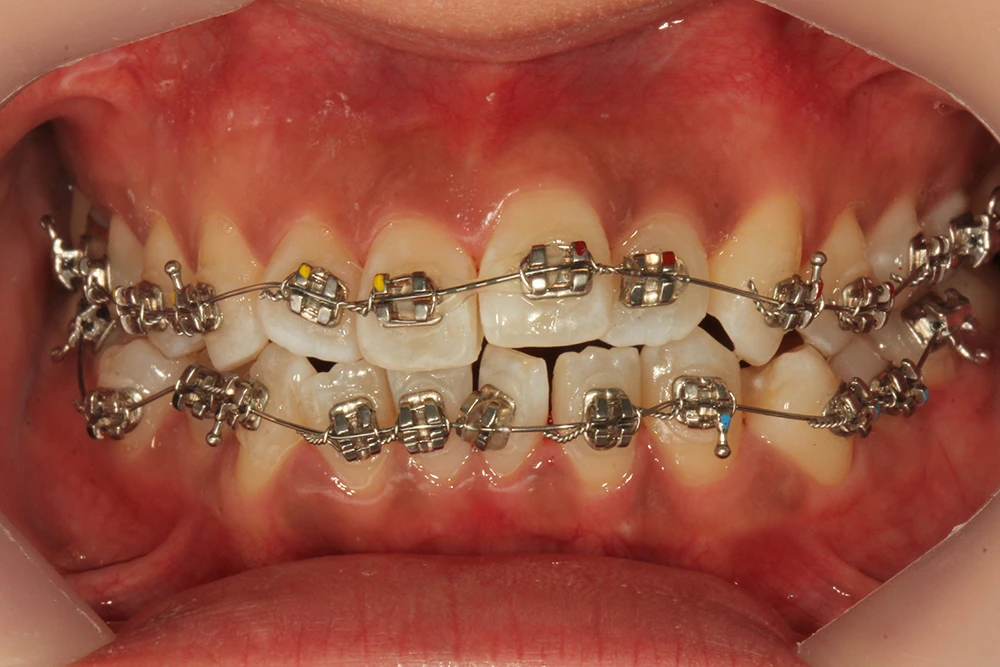
Photographed: 27 January 2011
Finishing orthodontics before veneers
After aligning the teeth, I planned how veneers would refine the remaining shape and the desired shade.

Photographed: 16 June 2011
03 · Preparing only the necessary areas
An important part of my assessment was how much tooth tissue had been removed. While creating room for the veneers, I aimed to keep preparation within enamel wherever possible.
These are actual records after preparation of the upper and lower front teeth. The thickness removed cannot be measured from photographs alone, so I will not assign an unsupported millimetre figure.
Upper front teeth after minimal preparation
After orthodontic alignment, I prepared the space needed for the veneers.
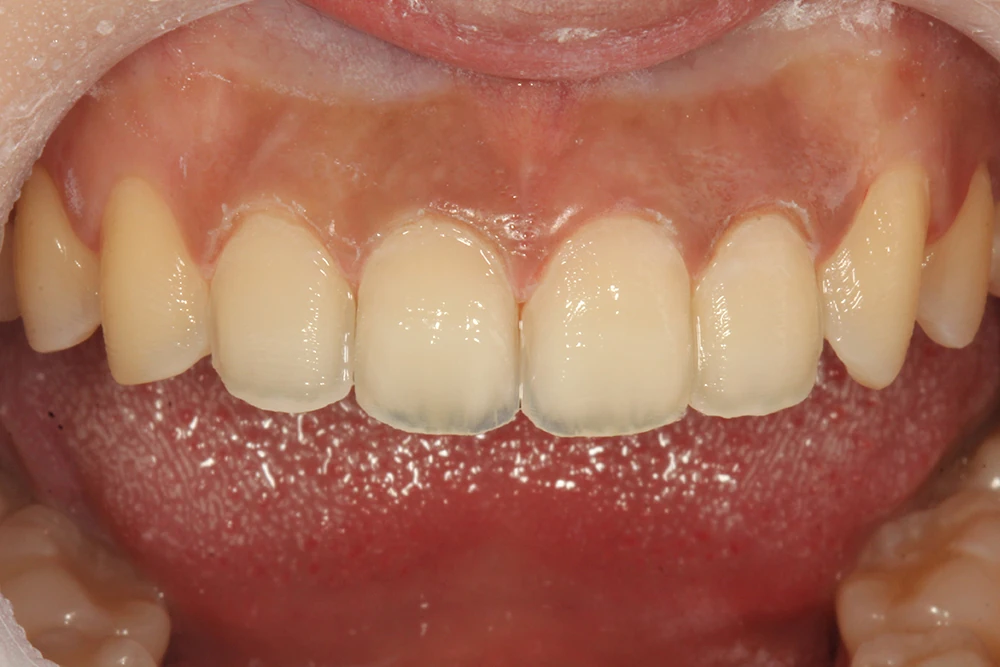
Photographed: 16 June 2011
Lower front teeth after minimal preparation
For the lower front teeth, I also considered each tooth’s shape and the bite when preparing the necessary areas.
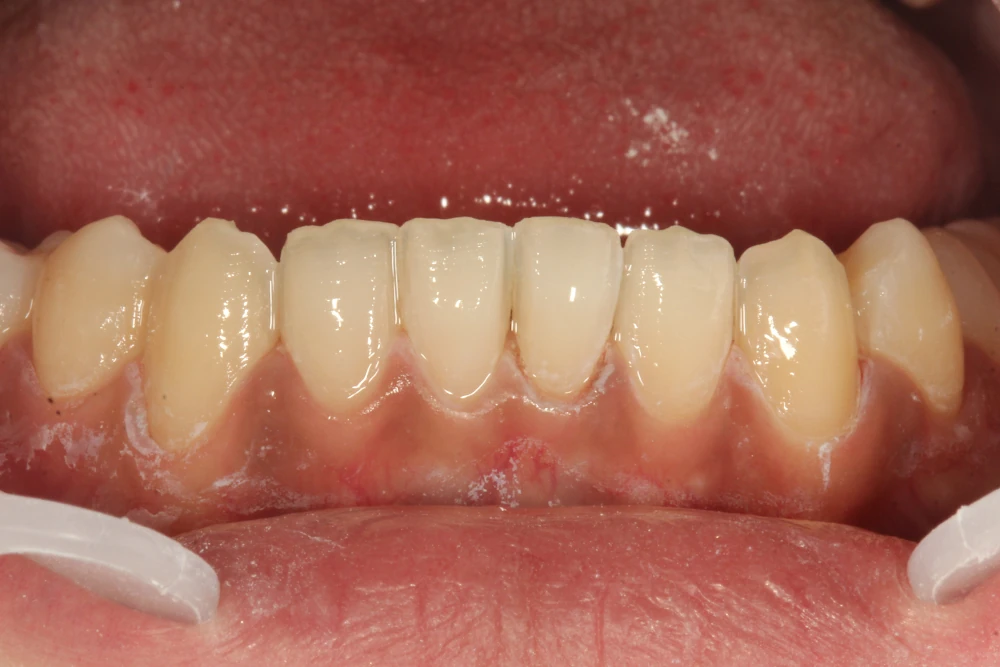
Photographed: 16 June 2011
04 · Checking the etched and dried surfaces
During the bonding preparation, I etched and dried the surfaces and reassessed the upper and lower front teeth. At the time, I clinically judged that enamel remained on the prepared bonding surfaces. This was a check on preserving the outer tooth layer as far as possible.
Enamel preservation does not mean that no tooth tissue was removed. Minimal preparation had already been performed. These photographs alone cannot guarantee the tissue condition at every site or the absence of long-term risks.
Upper teeth after etching and drying
The upper front-tooth surfaces prepared for bonding after minimal preparation.
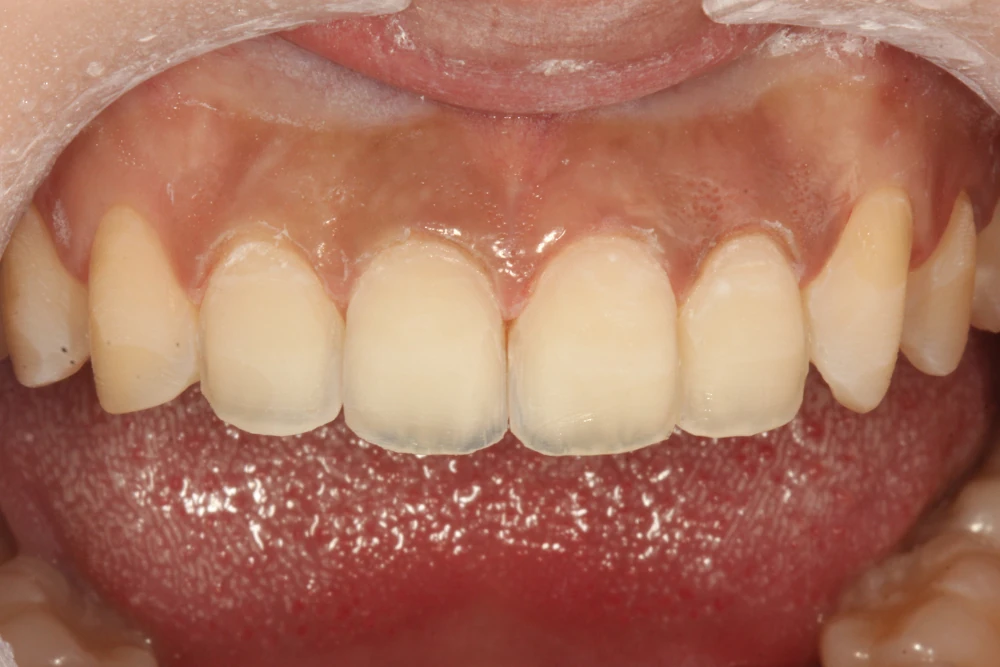
Photographed: 16 June 2011
Lower teeth after etching and drying
I checked the lower bonding surfaces at the same stage.
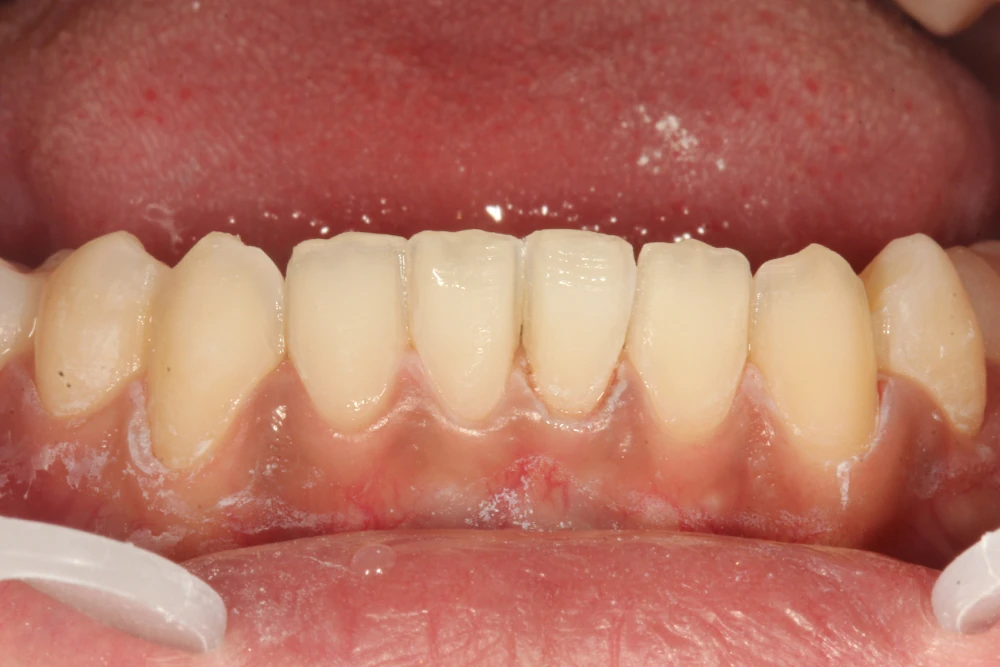
Photographed: 16 June 2011
05 · Refining shape and colour after alignment
Orthodontics can align teeth, but it does not itself whiten their natural colour or produce every desired tooth shape. This patient wanted a brighter shade and balanced front-tooth shapes as well as improved alignment.
I therefore used veneers to adjust shape and colour after orthodontic alignment. They addressed shape and colour goals that orthodontics alone could not achieve; this does not mean that everyone needs veneers after braces. Depending on the condition, orthodontics alone, whitening or composite bonding may be appropriate alternatives.
Immediately after veneer placement
A record immediately after placement was completed that day. This does not mean that the preceding orthodontic treatment was completed in one day.
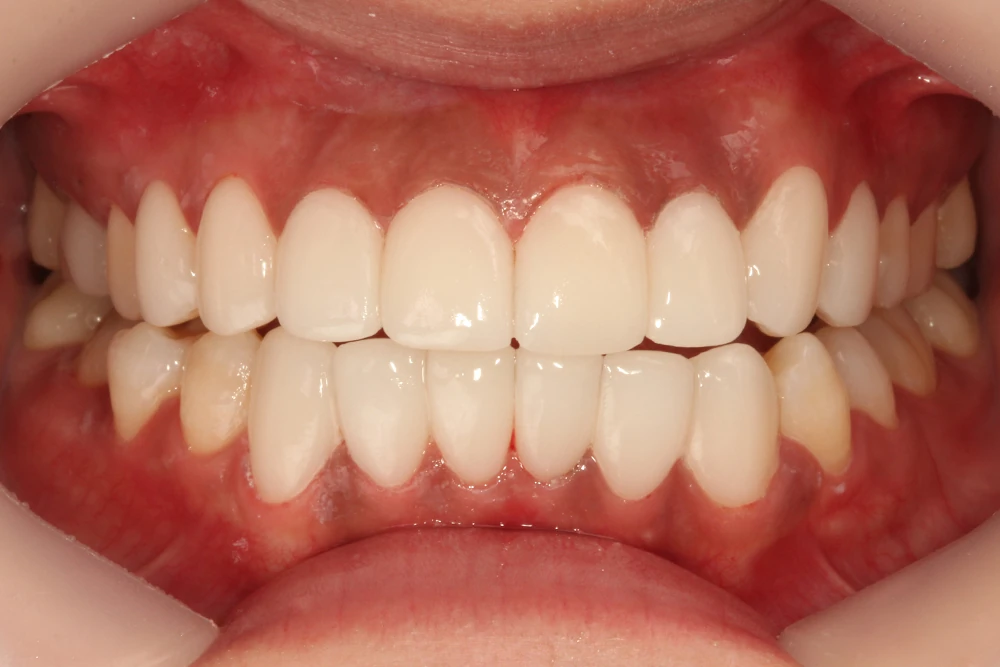
Photographed: 16 June 2011
One week after veneer placement
The appearance and bite were checked again one week later. Long-term outcomes not documented in these materials are not presented as results.
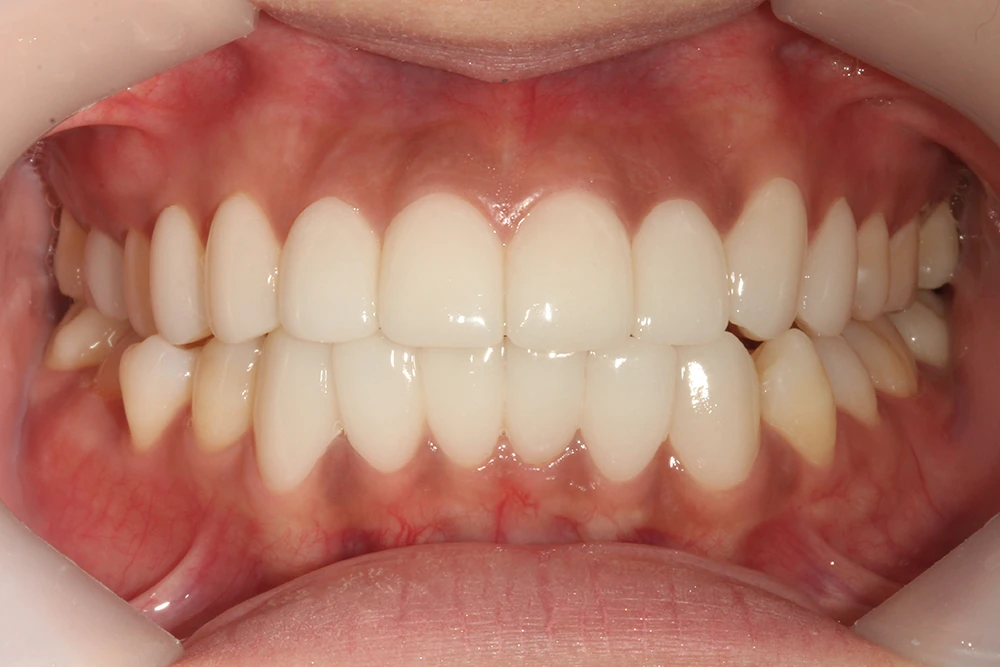
Photographed: 23 June 2011
06 · Assessing profiles and smiles as well
I did not assess frontal alignment alone. I also recorded the front teeth in profile and smiles from both oblique angles. Camera direction, lip movement and lighting differ between images, so photographs do not establish precise measurements of protrusion or colour change.
Left profile smile
The photographs show the before-treatment view followed by the after-treatment view.

Photographed: 27 January 2011
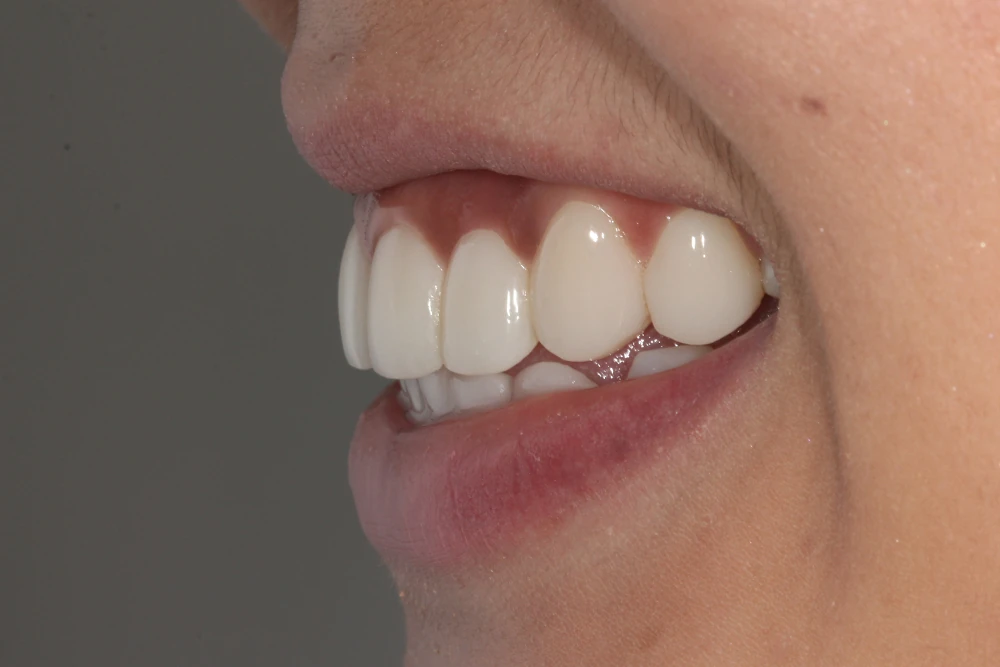
Photographed: 23 June 2011
Right profile smile
The photographs show the before-treatment view followed by the after-treatment view.

Photographed: 27 January 2011
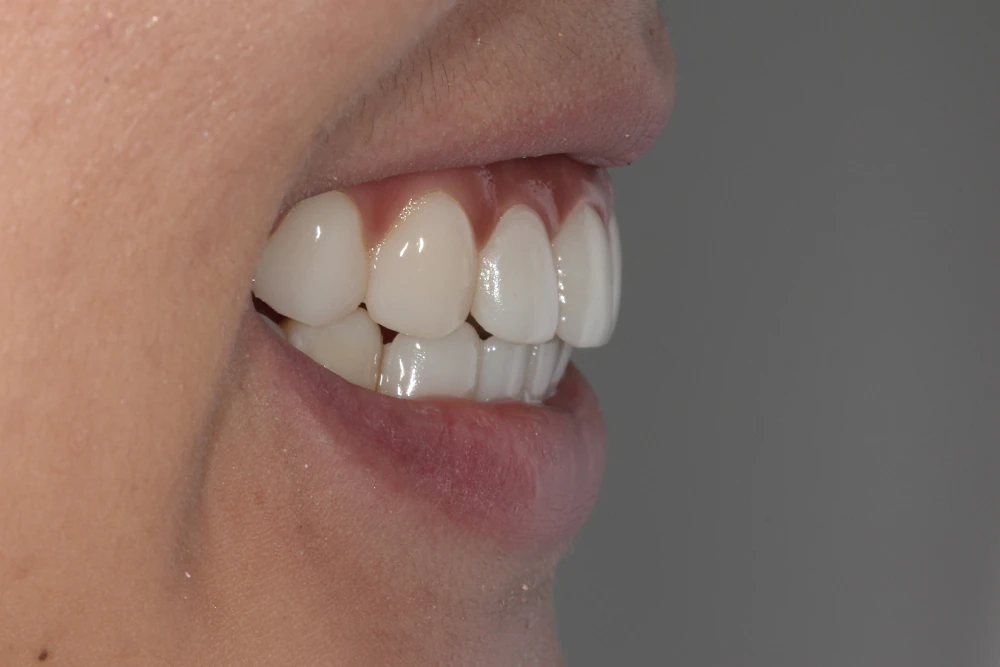
Photographed: 23 June 2011
Oblique smile
The photographs show the before-treatment view followed by the after-treatment view.
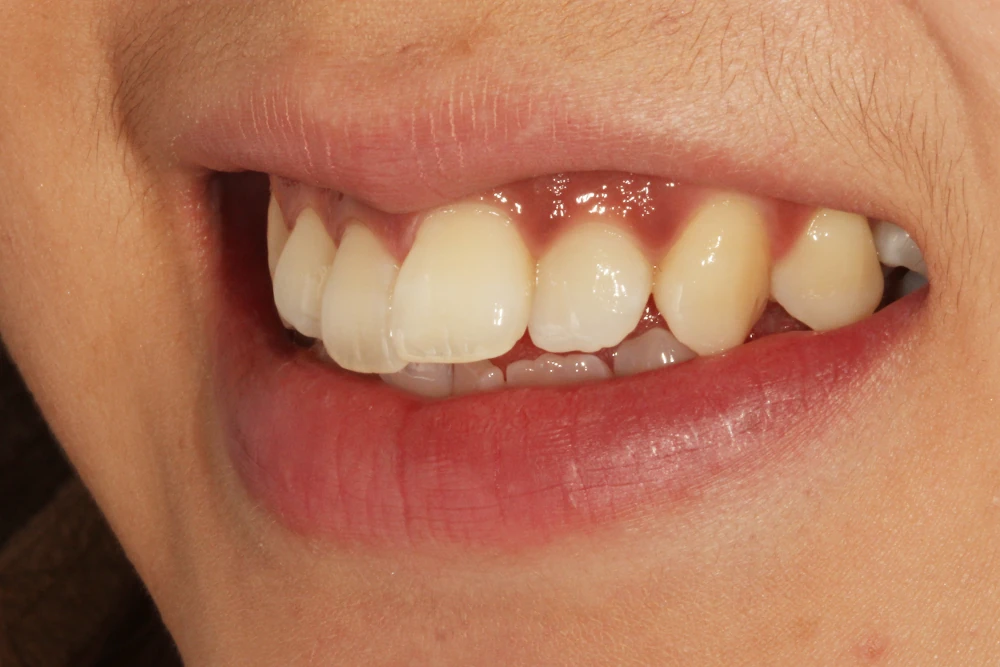
Photographed: 27 January 2011

Photographed: 23 June 2011
Opposite oblique smile
The photographs show the before-treatment view followed by the after-treatment view.
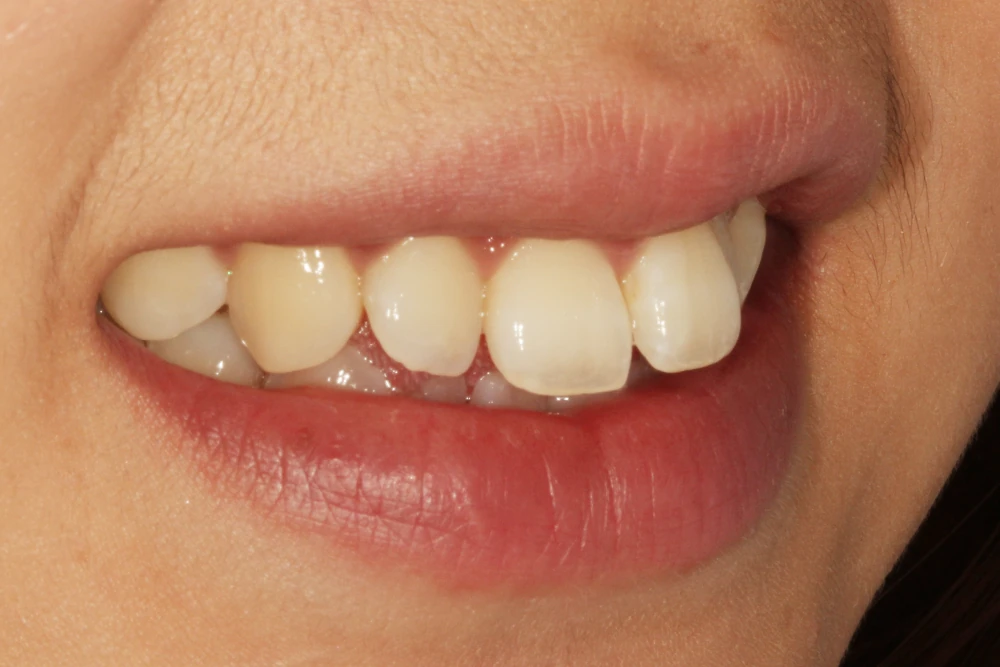
Photographed: 27 January 2011
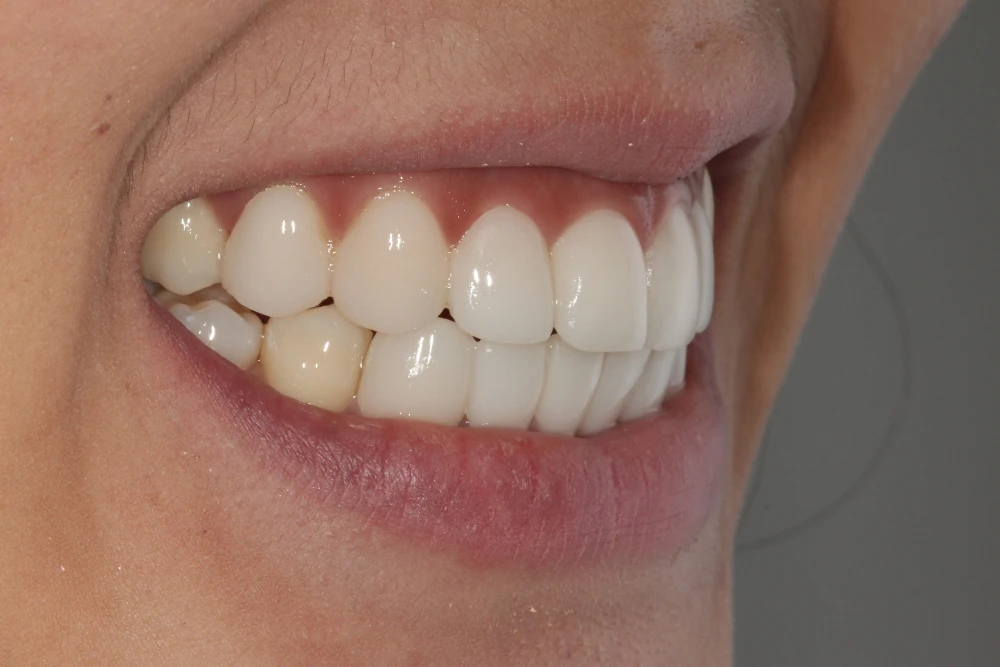
Photographed: 23 June 2011
07 · Retainers and cleaning remain important
Retention is needed after treatment to help limit tooth movement. Fixed retainers are visible behind the teeth. Cleaning around the wire and between teeth, and regular checks for breakage or detachment, remain important.
Upper arch after treatment
The upper alignment and the retainer behind the teeth.

Photographed: 23 June 2011
Lower arch after treatment
The lower interdental spaces and the areas around the retainer also need cleaning.
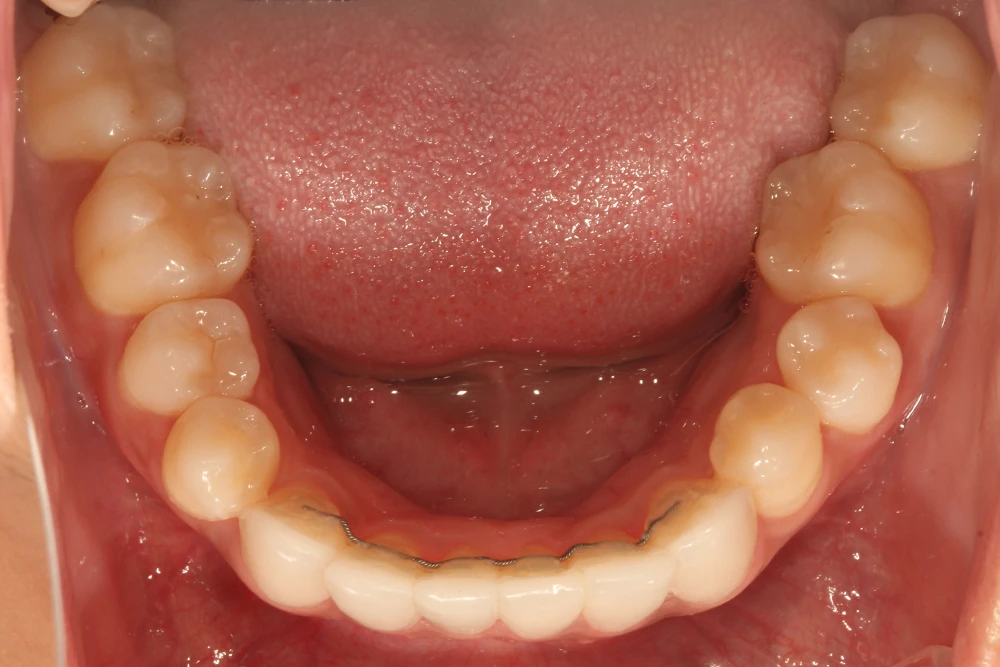
Photographed: 23 June 2011
Additional before-and-after comparisons
These composites place previously shown records side by side: before treatment on the left and after treatment on the right. The photographs were taken on 27 January 2011 before treatment and 23 June 2011 after treatment.
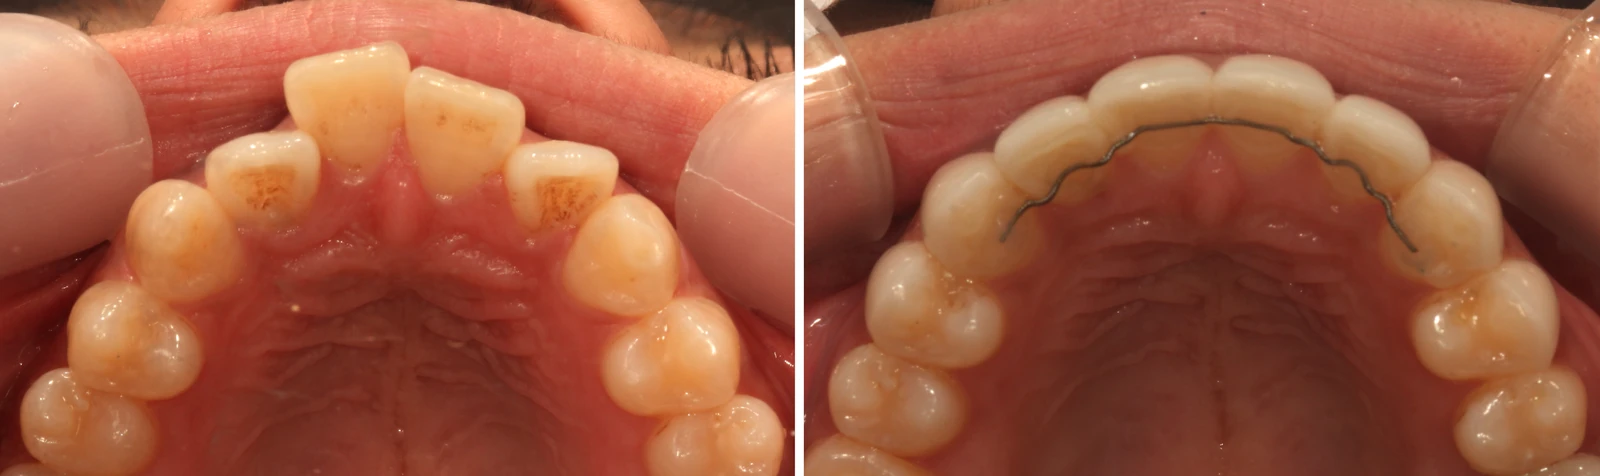
Left, before: 27 January 2011 · Right, after: 23 June 2011
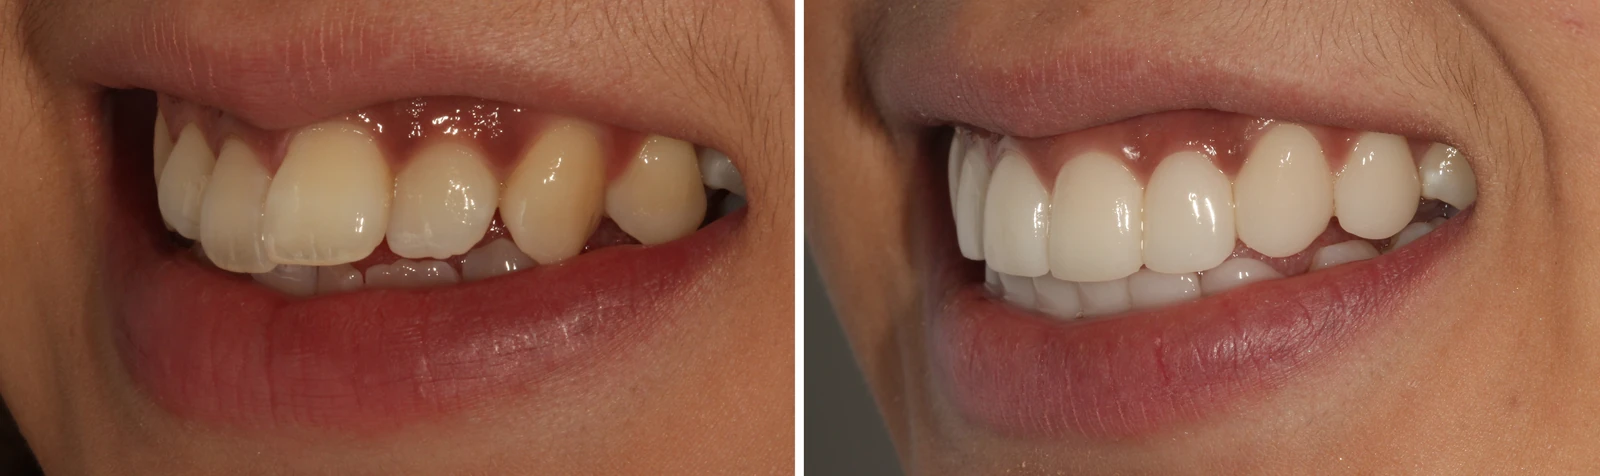
Left, before: 27 January 2011 · Right, after: 23 June 2011
Frequently asked questions
Can veneers alone correct protruding front teeth?
It depends on the degree and direction of protrusion and the bite. If teeth are substantially out of position, changing shape alone may require more preparation. I therefore consider alignment first, as in this case. Jaw-related protrusion requires a separate assessment.
How is limited front-tooth orthodontics different from comprehensive treatment?
Limited orthodontics has defined movement and treatment goals. These may differ from comprehensive treatment addressing the overall bite and jaw relationship. A shorter duration alone is not a sufficient reason to choose it.
Are veneers necessary after orthodontics?
Not necessarily. In this case, the patient wanted changes to shade and shape as well as tooth position. I first explain whether orthodontics alone, whitening or composite bonding could meet the goals.
Are minimally prepared veneers the same as no-prep veneers?
No. Minimal preparation removes tooth tissue within a limited necessary area; no-prep treatment does not prepare the tooth in that way. Actual preparation was performed in this case. The amount removed and the potential to preserve enamel depend on each tooth.
Does remaining enamel rule out sensitivity or fracture?
Preserving enamel is important, but it does not mean there are no risks. Sensitivity, debonding, fracture, decay and gum problems can still occur. Maintenance and regular examinations are necessary.
Do I still need retainers after veneers?
A retention plan remains necessary to help limit relapse after orthodontics. Veneers do not replace retainers. Have the appliances checked and ask for advice on flossing and interdental cleaning.
How much does this treatment cost?
Costs depend on materials, treatment scope and tooth condition. When orthodontics and veneers are combined, the reference veneer fee is distinct from the total cost including orthodontics. An individual plan and total estimate are provided after diagnosis.
View reference veneer fees →View reference veneer fees →The fee page shows current reference fees, not the amount this patient actually paid.
Related information
Veneer indications and treatment planning · Veneer case with orthodontic retainers
Sources for general treatment principles
Veneer indications, preparation and maintenance: American Dental Association patient information. Orthodontic and restorative approaches: British Orthodontic Society patient information. These sources support general explanations; they do not guarantee this patient’s outcome or the absence of risk.